Are you a music producer? Do you want to learn how to make a sample pack for yourself and others to use in their musical productions? With the right product and marketing strategy, sample packs can earn income for years. Below are our key tips to help guide you through the process and answer common questions many creators run into when creating a sample pack.
First, I’ll cover some of the more technical aspects involving industry standards, then move onto some creative strategies, and our process for expanding upon ideas within your pack.
Labeling is “Key” 😏
Creating quality sample packs alone is not the only thing you need to focus on. You want to be sure you’re following industry standards, as well. This is super important. Get into this habit from your first sample. That way, you get used to the process and don’t have to backtrack way after the fact.
Adding common descriptors to the file names of your samples gives the user more data about the samples from the start, while also helping organize the sample pack for an optimized workflow. The most commonly used filename labels are musical key, bpm, sample type, and pack name or pack name abbreviation. If you plan to sell your sample pack through distributors such as Splice, your sample pack will need to follow certain industry-standard file naming guidelines. Below is a widely used format for labeling your samples (thanks to Black Octopus for sharing their wisdom with us over the years).
Filename Format:
PackAbbreviation_SoundStyle_BPM_Key_UniqueName.wav
Example:
AE_Bassloop_140BPM_F_GrittyReese
The pack abbreviation will give the sample an identifying prefix to help distinguish your samples from others with possibly similar file names. For instance, the sample pack name “Alien Energy” can be abbreviated as “AE”.
The “Sound Style” tag will tell users whether it’s a loop or one shot and categorize the sample into a wider, more generalized group.
BPM and Key are pretty self-explanatory.
“Unique Name” refers to a fun name for the sound that will help the user remember samples that catch their ear, while also adding another layer of uniqueness to distinguish your samples from others. Unique name identifiers are less commonly used on drum hits like kicks and snares where you might have a large number of subtly different sound timbres.
Better Safe Than Sorry
If you plan to sell your sample pack, refrain from using any samples that could result in any sort of lawsuit or legal action. For example – clips from famous acapellas, classic samples that may be traced back to the original recordings, and samples already up for sale somewhere else. If you have to question its legality, it’s not worth the risk and you want to stay away from those question marks.
Exporting Details
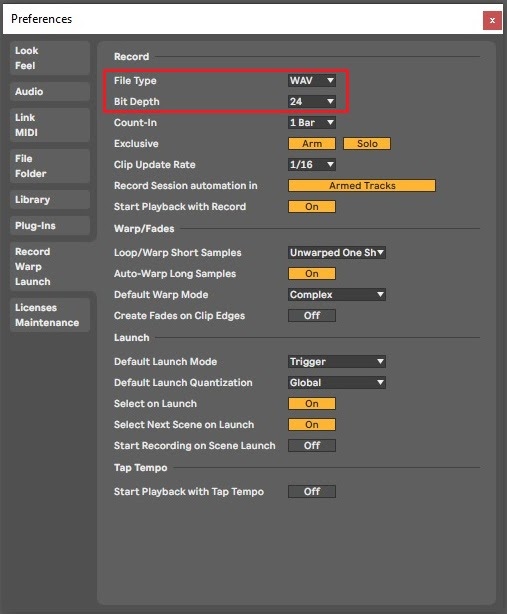
Exporting your samples with the right settings will help standardize your samples to be on par with other sample packs on the market. For starters, the most commonly used format is 24 bit WAV at a sample rate of 44.1k. Also be aware of the bit depth and sample rate used during your recording sessions. For example, when recording samples within Ableton, you can set the recording bit depth by changing the following settings: (Preferences> Record/ Warp/Launch > Bit Depth). * Pictured Below
Samples should have a minimal amount of silence before the sample starts and after it ends. When exporting loops, set the loop markers or start/endpoints so that the loop retains any reverb or delay tails.
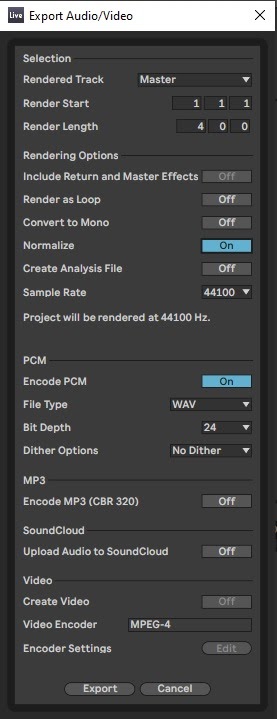
Make sure to turn the “Normalize” option on when exporting. This will ensure that all exported samples will have a consistent peak of 0 db. Lastly, you want to turn off any dithering in the export settings. * Pictured Below
Folder Structure/Hierarchy
Folder hierarchy should be sorted systematically to ensure the user can easily navigate the sounds with minimal clicking and an optimized workflow.
Typical folder sorting categories are :
Bass, Synth, Drums, Vocals, FX, Instruments, Bonus
We typically separate loops and one-shots, as they have different use cases in production.
Here’s an example of our preferred folder structure:
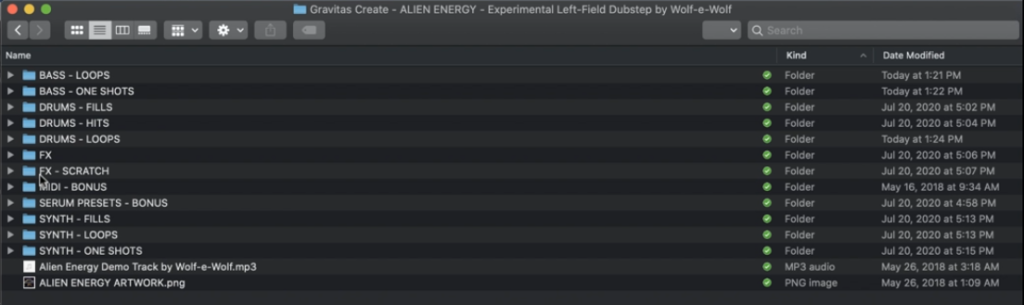
Be Original
Now that some of the technical aspects of making your own sample pack have been covered, let’s discuss the more creative and philosophical ideas behind creating a pack. Splice alone has literally MILLIONS of samples to choose from; and many producers pour endless hours of work into their sample packs. If you hope to sell your sample pack, it’s a good idea to try and provide something uniquely YOU. Get creative and offer something that hasn’t been covered a million times over. This doesn’t mean you have to re-invent the wheel. Just try and put your own spin on the sounds, while remaining useful to other producers. Think about which sounds you could use more of or wish you had for your own collection.
Along with this, honing in on one particular genre or theme is much better than having a sample pack that touches a lot of random genres.
A Chinese proverb illustrates it well; “If you chase two rabbits, both will escape. The meaning is that if you put your efforts and energy into trying to fulfill two goals at the same time, you won’t succeed in either one.
If you want to make a conscious hip hop pack, do it. If you want to make a melodic bass music pack, do it. We’d advise against making a sample pack that merges conscious hip hop and melodic bass though. Find the genre you want the sample pack to be classified under.
Expanding Ideas
So you have your basic melody or riff recorded, now what? Try running your loops through glitch and fx plug-ins for random generative sounds you might not have come up with on your own. On the other end of the spectrum, bouncing a dry version of your riff enables the user to add their own FX chain. While your FX chain might be what makes the sound have a specific quality, keep in mind that things like compression and reverb are really difficult or near impossible to dial back if it’s not to the user’s taste. Time-based effects such as delays may confine the sample to a specific tempo as well. One-shots may be more versatile without such FX.
Another practice to expand the size of your sample pack is to try recording the same riff at different tempos and in different musical keys. This enables the user more musical flexibility without having to time stretch or transpose to meet the needs of their project. Take this advice with a grain of salt though. TOO many versions of the same riff could be disappointing to someone expecting a larger number of unique riffs. Finding a middle ground between both practices is ideal.
Don’t Underestimate the Value of Good Artwork
Of course, the quality of your sample pack is important. However, there is a saying in marketing that the packaging is as important as the product. The design of the sample pack’s artwork should not be overlooked. You want to create something that will entice fellow music producers to check out your product over a competitor’s.
Even if you’re not particularly skilled at graphic design, look for a freelance designer to whip up something for you! If you can’t commission a brand new design, you could even see if you may license a pre-existing piece. We’ve found some success with Art Grab, both for sample pack and some album covers.
Demo Time!
So you’ve wrapped up your sample pack, and it’s time to showcase what it has to offer. One way to showcase a handful of melodies and loops within a single demo track is to approach it as a 2 or 3 song mini mix. You’ll be using this demo track to show prospective producers what the pack offers and what type of sounds are in the sample packs, so be sure it’s quality. Start by making 3 short demos and use creative methods to blend them together into one audio file. This could be achieved with ambient fades or traditional “dj style” transitions. When possible, avoid misleading the user with samples not included in the pack. Some creators make multiple demo tracks, but one is fairly standard. You can upload the WAV or MP3 audio to SoundCloud.
Creating videos for the pack is helpful, as well. One video for the full walkthrough and one video for promotional purposes. For the promo video, it can be a simple visualizer with the demo’s audio playing in the background. Having a walkthrough video is helpful when you’re trying to promote the pack on subreddits, and you can use YouTube to host. Here’s an example of one we made for our Mutate – Serum Presets. You can see how we are able to use it on our product page and it’s easy way for people to explore the sounds.
For More Information
If you have any more questions about how to create killer sample packs, join our Discord server! We have music producers, sound designers, music business professionals, etc. who have a wealth of knowledge to be shared. It’s also just a great way to make new friends and meet like-minded people.
Our server also hosts monthly challenges, where listeners create sample flips and may even earn free sample packs from the Gravitas Create store!
If you’re a music producer who wants to improve their music production, use the link below to join our community!
JOIN GRAVITAS NATION DISCORD SERVER
If you’re looking to learn more about developing your sound and growing your artist project:
Music Theory Cheat Sheet
How to Pick a Music Distributor
How to Send Your Demo to a Record Label
Sorry, but you have already liked this article.