By Thomas Weathers of Virulent Audio
“When I first started on my audio journey, there was a crazy amount of information to take in. Some of that information included was various approaches to mixing different engineers use. At the time, I wanted to make music and I wasn’t at the point where I was taking on clients so I adopted what is known as “The Faders Up” technique. In this technique, you bring all of your channels down to –infinity and slowly bring everything back up so you can accurately make calls on what is too loud. For years I mixed like this and even much into my career. If the “Faders Up” technique is what is most comfortable for you, then go for it. What I’m going to explain today is an approach used by many big-name engineers to mix not only faster but getting a better product most of the time. It is just one approach in what may be a vast sea of mixing philosophy. This read intends to focus in on more of the approach to mixing rather than specific techniques and is by no means the final word on the topic. I will include some techniques that I feel really progressed my skills as an audio engineer. Enjoy!”
Mix Prep
Ask any professional what the most important part of any of their process is and you will most likely you receive an answer that includes prep. In the words of Abraham Lincoln; “give me six hours to chop a tree and I will spend the first four sharpening the ax.” Start by loading all of the project’s stems into an empty project (with all of the faders at 0) and organize them into groups to ensure that all similar elements, such as drums or vocals, are together.
It’s advisable to utilize color coding as it makes it much easier to find channels and groups when you are looking for them deep in the mix. In most DAWs this is as easy as selecting all of the channels in a group, right-clicking, and choosing the coloring option. A pre-made template can be invaluable for an engineer here as it could shave off hours of your mixing time. Next, grab a notepad and a pen.
“It’s advisable to utilize color coding as it makes it much easier to find channels and groups.”
![]()
Before adding plugins everywhere (if using a template be sure to bypass everything) take a listen to the song dry. The bare recordings are the point of focus with what you are assuming is the centerpiece muted unless the song is self-made and either do not have vocals in the song or know what the most important element is; in which case go ahead and mute that instead. Listen and take notes. Is there anything that evokes a negative response from you, the listener such as little pieces here and there that are out of tune? What feelings does the music itself convey? What images come to mind? Try to be as detailed as possible and write down everything that comes to mind. What do you think is the driving force in this song? Most importantly, write down the images that come to mind when listening.
If there are vocals in the track, 99.9% of the time those are the most important element in the mix. The vocals are being muted during the first listen so that one can get a get a feel of where and how the vocals should fit into the mix. Yes, they may be the centerpiece but as with most things in life, without the proper context, things tend to not make much sense. An audio engineer’s goal is to do what is best for the song, not just one element of the mix. The best vocal sound in the world does nothing for the artist if it does not fit the song or if all the other parts of the song are in shambles. The instrumentation is the guide for what the song could be as well as being the deciding factor of how you want to process your vocals/main element. If the instrumental sounds clean and polished, or dark and moody, your processing should also kind of reflect those feelings too.
“An audio engineer’s goal is to do what is best for the song, not just one element of the mix.”

Unmute the vocal/main element and ask yourself, what could be done to make it emotionally fit better in the mix? It might not be the best idea to aim for bright, well-polished vocals if the rest of the song has a darker tone or mood. In context, it just doesn’t make sense. Continue taking notes adding in ideas as to what can be tried creatively until the song is done playing back.
If given a rough mix, listen to that and confirm that the assumptions made during the note taking process were correct. If it sounds like the artist values their synths over a vocal, then the synths are the main. If you were wrong in your assumptions, you might want to re-listen and take notes again but focusing on the element that you now know is the focus. Due to the limitations of the brain, it is good practice to wait a little while before re-listening so your ears have a chance to forget the song a little. Otherwise, you may continue to only focus in on the wrong pieces.
Faders Down
Excluding the main element of the mix, grab every fader and bring them down to –infinity. Start processing the vocals or main part of the song with EQ or compression. For the most part, this is pretty standard but at the same time, one must also be making decisions that get the song closer to its most idealized form. This could include removing harsh frequencies, adjusting the volume of specific channels, or removing low-end rumble in elements that may be conflicting with bass elements (kicks, subs, bass). Make sure the vocal is at a decent level. That means not too loud, not too quiet. From personal experience, the best vocals fall between -20 to -16 dB. It depends mostly on the delivery of the vocals and the characteristics of the performer’s voice. Let’s say the vocalist has a voice that’s mostly low end and the top is just kind of absent. Naturally, vocals like these are probably going to need to be driven just a little harder than say a female vocalist with a rich top end.
“…slowly bring them up so that the mix is hitting around -6 on your mix buss and you can hear everything”

Now it’s time to grab all of the faders (except the main focal point) and slowly bring them up so that the mix is hitting around -6 on your mix buss and you can hear everything. I then spend the next hour or so balancing the mix. In this age, we work a lot with samples and many times, those samples are perfect in terms of EQ and compression. Sometimes all that’s needed is to make a little room in the spectrum for another element. If your work is primarily sample-based, you may not even need to use compression on those elements. Overall though the balancing should be focused on making that main element to centerpiece of the mix.
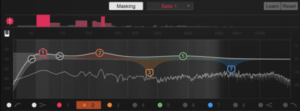
EQ and Resonant Peaks
All instruments and vocals have resonant peaks. These are the frequencies commonly associated with different keys (such as A=440Hz) and varies depending on what key you are in. One can save themselves a ton of EQ moves (in particular boosts) by simply taking them down a few. The area you should primarily pay attention to is the 100-400 Hz range. To do this, simply pull up an EQ and make the cue an intermediate size (not too narrow, not too broad.) Then boost and sweep the cue until you hear it sound like the mic is too close to the source. It’s helpful to think of whatever element you are working on like a vocal. When someone is too close to the mic, the proximity effect is much more apparent and a certain sound is acquired. When the spot has been found, just take it down a few dB. This will make masking less of an issue and you may even find that you do not have to do nearly as many boosts as you have before. Masking is what happens when one sound overpowers another sound of similar volume. If the source is needing a boost, try boosting the next harmonic in that scale.
“Masking is what happens when one sound overpowers another sound of similar volume.”
High-passing is a technique many people use to save some time on the low end. Rightly so, as the technique can be very effective as long as it isn’t removing too much of the low end. There are engineers like CLA that do not believe in high-passing everything but for most its sworn by. Many people place a high pass at 80 Hz to take care of everything that isn’t a kick or a bass. While this can be useful, it may not even be doing anything or it may even be making your mixes worse by taking away too much low end leaving a paper-thin sound. The best advice I could give here is to just use your ears. With high-passes just keep cutting until you hear something that gets removed and it really takes away from the sound then dial it back a little so all of the thickness is not removed. The point of this is to stop extremely low noises from colliding with your bass elements like the kick/bass. The vocals may vary from 100 Hz to even 200 Hz. For general applications, 80Hz may be just fine but I encourage you to dig and find that sweet spot. Your mixes will thank you for it.
Making Busses
An engineer’s life could be made easier by abusing busses. It can save a ton of headaches by making everything come from its own buss. That’s not saying to make each kick have its own buss (though it is helpful when working with 5 different kicks) but each sub mix should have its own buss. A buss that has only drums and its effects should be your drum buss. The drum reverb should also come through the drum buss. Once all the drums have their own buss, you should then send the output of that buss to another buss encompassing just your instrumental elements. Label it something catchy like instrumental buss and repeat this process for each one of your groups. In the instrumental buss, do not include vocals but send the output of this instrumental buss to the mix buss. Within the mix buss, the instrumental mix should meet up with the vocal buss and its effects. This tends to make it easier to make adjustments to whole groups as well as making the exporting stems part not as much of a chore. On top of this, there should be fewer shenanigans going on with things like the drum reverb being printed on the synth stem.
Thomas Weathers is a Producer/FOH/mixing/mastering engineer based out of Midland TX where he runs Virulent Audio. The studio itself specializes in bass music, EDM, Hip-hop, Indie, Rock, and Christian/Gospel. Thomas has 8 years of experience in the studio and over 10 years in music as a cellist, violinist, and a DJ. Thomas is currently producing albums for three bands. Connect with Thomas: VirulentAudio.com
Sorry, but you have already liked this article.